System Specifications and Symbols
– Specifications
– TrakStation Performance Specifications
– Symbol Glossary
– Intellectual Property
Overview
1. Overview
The TrakStation® is a simple system that provides pH monitoring within a closed environment, such as an incubator, without opening and contaminating that environment. The TrakStation is intended for general laboratory use – not for diagnostic use. The overall system includes the TrakStation and TrakPods for use with the sv2 sensors and qc2 System Alignment Tool. These items are all described in this document.
Device Description
The sv2 sensor cup is a small surrogate vessel into which you put a sample of the media whose pH you want to track. At the bottom of the sensor is a special membrane that contains a dye. This dye is affected by the pH of the media sample, and it reacts to light differently at different pH levels.
The sensor fits into the fiber optic fixture. To make a measurement, the machine sends flashes of light of a certain wavelength through the fiber optic fixture. The dye in the membrane reacts by sending back flashes of light at a different wavelength. The machine reads this result and calculates the pH of the media sample. You can set the timing of this measurement to be once per minute or once every 30 minutes.
The system includes
TrakStation: This is a tablet computer running proprietary software. The software initiates pH readings, as well as stores and displays these pH measurements over time. Using an included USB 3.0 hub, up to eight (8) TrakPods can be connected simultaneously to a TrakStation.
TrakPods: The TrakPod is the proprietary, LED-based, optical pH measurement instrument. One TrakPod is needed for each incubator chamber that is monitored. TrakPods have internal magnets, allowing them to be placed on the side of large format, cabinet style incubators. It is a USB connected fluorescent measurement device with a fiber optic cable and fixture that connects to the sv2 Sensor inside of an incubator. The TrakPod and sv2 Sensor together detect the pH of a liquid sample.
sv2Sensors: The sv2 sensor is a disposable. It is a small surrogate vessel into which you put a sample of the media whose pH you want to track. 100 µL of media and at least 50 µL of oil are used in the monitoring test. At the bottom of the sensor is a special membrane that is impregnated with a proprietary dye. This dye is affected by the pH of the media sample, and it reacts to light differently at different pH levels. The sensor fits into the fiber optic fixture. To make a measurement, the TrakPod sends light flashes of a certain wavelength through the fiber optic fixture. The dye in the membrane reacts by sending back flashes of light at a different wavelength. The TrakPod reads this result and calculates the pH of the media sample. A sensor is used for seven (7) days in a normal test with a pH reading frequency of 30 minutes. Alternatively, it will only last three (3) days if the pH reading frequency is one minute. sv2 Sensors are provided in a kit of ten (10) individually pouched items.
qc2Alignment Tool: A fluorescent reference device for use in System Alignment and Quality Control. The qc2 System Alignment Tool contains a fluorescent target with a stable and known fluorescent signal. Between each week of pH monitoring, the qc2 System Alignment Tool is used to check that the TrakPod fluorescent signal is still performing according to factory specifications. If any changes in the fluorescent signal are detected the TrakPod can make adjustments to the detectors to restore it to appropriate performance levels. One qc2 System Alignment Tool is needed for each lab and it is replaced annually.
The TrakStation’s user interface is described in Section 6, Menu Functions.
The TrakStation is an accessory to benchtop and large format style incubators and is a prescription use only system. Consult with local regulations for restrictions on its use.
The TrakStation cannot be relied upon to measure pH outside of pH 7.0 – 7.6 range.
The TrakStation system is intended for use with bicarbonate buffered media at elevated CO2 and temperature. HEPES-buffered media should not be used with the TrakStation System.
When using media with an intended use time of less than 7 days, it is advised to change the sv2 Sensor cup with the same frequency of the media by ending the pH test and starting a new test with a new sv2 Sensor cup.
Tablets connected to internet service may be susceptible to viruses – caution should be taken to reduce the risk of malware infecting your TrakStation tablet.
Automatic updates to the TrakStation tablet OS and to the web browser have been intentionally turned off as default factory settings. Manual updating could result in unknown or limited TrakStation performance.
The TrakStation software is not meant to collect or store patient data- the security of the tablet is determined by the security of data through customer WiFi Settings. The TrakStation is provisioned to enable WPA passkey authentication. The user is instructed to choose secure networks for WiFi connections.
A new TrakStation and TrakPod(s) will require a short procedure to align the units for your environment. Plan on spending about 15 minutes the first day and 15 minutes the second day for setup activities.
Components
TrakStation
Quick Reference Guide Startup Sheet
Tablet
Power Supply
10 port USB Hub
Power Supply
USB cable
Magnetic Mounting hardware
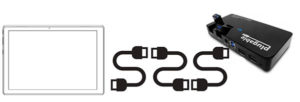
3x Magnetic Cloops for cable management
USB Drive
2x USB extension cables
1x USB type C adapter (for Microsoft Surface and Lenovo only)
1x USB type C to barrel plug adapter (for Lenovo only)
1 x tablet keyboard (for Lenovo only)
TrakPod (Cabinet Style)
Quick Reference Guide startup sheet
TrakPod
Mini USB Cable
1x Magnetic Cloop for cable management
TrakPod (Benchtop Style)
Fully integrated into your benchtop incubator, just connect a Mini USB Cable
1. Option For Keyboard Attachment: Connect power to the TrakStation tablet and turn on tablet power.
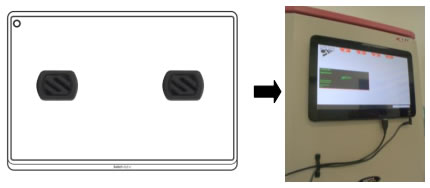
Pictured: TrakStation Setup For Connections (Microsoft Surface top, Lenovo bottom)
Option To Mount Tablet Without Keyboard: Mount the TrakStation in a convenient location for the incubators you will be monitoring. A magnetic mounting option is provided capable of holding the TrakStation on most stainless-steel incubator doors and sides. If the magnets are not already applied, affix the two Magic mounts positioned on the back of the TrakStation as pictured below. Clean the TrakStation surface with the provided wipe and press firmly for at least 30 seconds to allow best adhesion of magnets to tablet.
Pictured: Magic Mounts on Back of TrakStation
If needed, use the additional metal plates pictured below to affix to the incubator for better magnetic strength.
Pictured: Magic Mount Metal Plates
CAUTION: Do not put the metal plates on the TrakStation and the Magic mounts on the incubator. This will damage the TrakStation’s hard drive
2. Plug the power supply in for the TrakStation (B) and turn on the TrakStation tablet (C). The automatic start of TrakStation interface after windows boot up may take a few minutes.
3. Connect power to the USB Hub
Pictured: Connections For USB Hub to Power Source
CAUTION: Your laboratory setup may require the use of extension cables. If a USB cable longer than 6 feet (1.8 meters) is needed, an active repeater is required on extension cables.
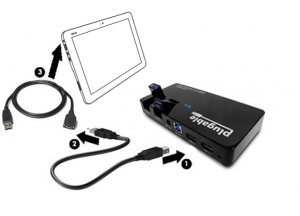
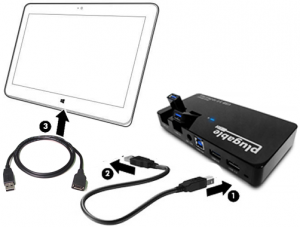
4. Plug the 10 port USB Hub into the TrakStation (A) using the USB cable, one of the USB extension cables and if applicable a USB type C adapter. The USB Hub can be located out of the way either behind or on top of the incubator. See below for proper USB HUB setup by tablet model type. Optional: For 1 TrakPod use USB-C adapter to connect the TrakPod directly.
Pictured: Lenovo / MS Surface to USB Hub
Pictured: Acer to USB Hub
Pictured: ASUS to USB Hub
Pictured: HP to USB Hub
5. If desired, plug a second USB extension cable into the USB Hub and position it for easy access connection of a USB drive (customer supplied) to download data. Data can be retrieved by connecting the TrakStation to the local internet if applicable or downloaded as a CSV file to an external USB. See the Menu Functions Section for instructions to retrieve data (specifically the Pod Page and Remote Access).
Pictured: USB Drive Connected to Hub
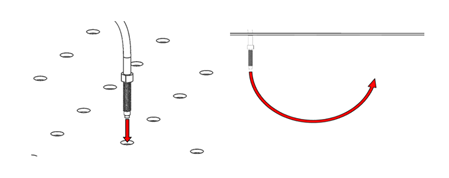
6. For Cabinet Style incubators, feed the TrakPod fiber optic cable into the access port of your incubator.
CAUTION: In order to prevent the fiber optic from being pinched by the self, feed the cable down through a hole in the shelf and gently loop it back up. Post-installation be sure to remove the TrakPod cabling from the incubator shelf while moving any of the shelves.
Pictured: Fiber Optic Cable Routing
7. Choose one of the middle shelves in the incubator and mount the fiber optic fixture onto the shelf of the incubator. Loosely assemble the fixture to the supplied wingnut and fiber optic cable. Then screw the fixture all the way onto the fiber optic and tighten the wingnut to hold it in place on the incubator shelf.
Pictured: Fixture Installed on Incubator Shelf
8. Cut the stopper for the access port in such a way that the fiber optic can be placed into the stopper and seal the access port of the incubator. A slit or wedge cut is recommended.
OR
Pictured: Modified Stoppers
9. Place the TrakPod onto the side of the incubator using the internal magnets to hold the TrakPod on the incubator. Use the magnetic Cloops as needed to keep the USB cables in place and tidy.
Pictured: Trakpod Mounted on Incubator CAUTION: The fiber optic cable must be handled with care during installation and handling of TrakPod units. This cable contains internal elements which can be irreparably broken if the cable is put under too much stress which may compromise TrakPod communicability and functionality. Do not over bend, twist, compress or pinch the cable.
DO NOT OVER BEND
10. Plug in the USB cable between the TrakStation’s USB Hub and TrakPod. For Benchtop Style incubators: The TrakPod is already installed inside the incubator (if available). Plug in the USB cable between the TrakStation’s USB Hub and the designated USB port on the back of the incubator.
Pictured: Cabinet TrakPod to USB Hub Connection
Optional: Use a USB extension cable as necessary to cover longer distances between the TrakStation and TrakPod.
If a USB cable longer than 6 feet (1.8 meters) is needed, an active repeater is required on extension cables.
Pictured: Benchtop TrakPod to USB Hub
11. On the TrakStation user interface, navigate to the Add/Remove Pods menu in ‘Settings’ and find the serial number of the newly-plugged-in Pod to add it to the TrakStation display. For each connected TrakPod, a user-specified name can be assigned such as an incubator number or identification that is going to be used.
12. Repeat steps 6 through 11 as necessary for additional TrakPods (up to eight (8) per TrakStation).
CAUTION: TrakPods should be connected, added, and assigned one at a time for optimal results.
First Use
The first time you use the TrakStation, the date and time should be checked and if needed, adjusted.
CAUTION: Windows Operating System tablet date, time, and network connections are configured at the operating system level. Adjusting other settings is not advised except at your own risk.
CAUTION: A new TrakStation will also need to have the qc2 alignment tool assigned to it. These can both be performed in the Supervisor Screen (see Menu Functions Section Supervisor Screen). Check that the dashes are included in the entry of the qc2 alignment tool.
Quality Control (QC) Test
When first connected, each TrakPod must have the initial QC test performed. For a full description of QC testing see ‘Routine Operations Workflow – QC Testing’.
CAUTION: Perform the initial QC Test before continuing with Site Standardization.
Initial QC Test
The QC test is run from the Pod menu or the ‘Settings’ menu. Select the Run QC Test option to proceed through the test. NOTE: The FIND FIBER button will cause the Pod to flash the LED several times and allow you to locate which fiber optic might be associated with the chosen Pod.
Use a lint free tissue like a Kimwipe to remove any dust from the fiber optic surface.
Place the qc2 alignment tool on the fiber fixture. It can be helpful to apply downward pressure to the qc2 for the test to ensure it is fully seated on the fiber optic fixture.
Pictured: qc2 Alignment Tool on Probe
Press the CONTINUE button: The TrakPod will test the fluorescent signal and compare it to the assigned fluorescent levels.
The Screen will then display the result of the QC Test.
Site Standardization
Site Standardization is a procedure performed on first installation of the TrakStation systems and repeated if culture conditions are altered through a change in culture media, change in incubators, or a physical relocation. The site standardization requires a pH reference sample to complete.
Why is Site Standardization Important?
During TrakPod adjustment at the factory, several environmental factors are different than in clinical laboratory conditions including: CO2, medium composition, temperature, elevation, humidity, the condition of the incubator, and test equipment used by the manufacturer. Site standardization customizes pH monitoring values based on unique embryo culture conditions.
What is a pH Reference Sample?
A pH reference sample is used during site standardization to align pH monitoring to your embryo culture conditions. It uses media used in your lab for embryo culture and allows the TrakStation to determine your unique laboratory pH based on environmental conditions and medium composition. Recommended options for the pH reference sample include:
One additional disposable sensor with 150µL of IVF medium and sufficient oil to be read using a blood gas analyzer.
A medium sample created and read similarly to your previously protocol for pH measurement (such as using a pH electrode probe).
The Certificate of Analysis (CoA) value after duplicating the CO2 settings from the certificate.
CAUTION: We do not recommend solely using the CoA of the media as there is variance between media samples and the location of media manufacture.
How Do I Achieve Maximum System Accuracy?
Ensure that the incubator being used is properly calibrated for both CO2 and temperature. To calibrate, consult the incubator operator’s manual for your specific model. Verify the incubator temperature and CO2 concentration by an external method (i.e. Thermometer, Fyrite) before beginning your setup tests.
CAUTION: If using the CoA as a reference sample, it is also imperative that the incubator be set to the conditions (temperature and CO2 concentration) listed for the certified culture media. If the incubator settings are different than those stated on the CoA, pH values logged by TrakStation may not be the same as listed on the CoA.
At BCSI, the TrakStation system is set for Universal IVF Media, 5% CO2 and 37°C in Seattle, WA USA at an elevation of 46 Feet ASL. A tool to calculate pH changes is located here.
If you are in most any other location or use any other media or have changes to your incubators, you must execute the steps below.
CAUTION:BCSI recommends that you always execute these steps when first setting up the system.
Site Standardization Preparation
Remove IVF medium and oil from refrigerator and let sit out for a few minutes while getting the sensors ready.
Remove three (3) sensors aseptically from the sterilization pouches in which they arrived and place the sensors in a petri dish or rack. Sensors should be easily removable from the holder to minimize the time that the incubator is open when reading the sensors.
Prepare the pH Reference Sample (see What is a pH Reference Sample? for recommended options).
Hold the sensor with the opening upward. Carefully pipette 100 µL of media down the side of the sensor. Avoid adding bubbles while doing this step. Also avoid touching the pipette tip to the membrane.
Pipette oil onto each of the sensors. BCSI recommends using 50 µL for Humid Incubators, and 150 µL for Dry Incubators. Touch the tip of the pipette above the surface of the medium and flow the oil onto the surface of the medium avoiding bubbles. It should spread out and completely cover the surface of the medium.
Pictured: Sensor Preparation With Media and Oil
CAUTION: It is critical to allow the sensors to equilibrate for a full 24 hours prior to performing site standardization. Avoid opening the incubator more than necessary during this initial equilibration time.
Place all sensors in the incubator and let sit for 24 hours. Settings should be your normal CO2 levels and normal temperature near 37 ⁰C.
Site Standardization Readings
To read the pH Reference Sample, have your external pH measurement tool calibrated and ready to read.
Remove your Reference Sample from the incubator and quickly (within 30 seconds) read the pH value. Record or remember the reference sample pH for use later in site standardization. It is recommended to place the tip of the index finger over the top of the container or cap it while carrying it to the instrument. This will keep the pH as stable as possible in the lab atmosphere.
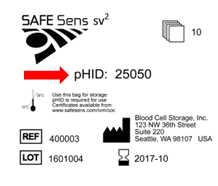
Using the Site Standardization menu tool for the specific TrakPod, Enter the pHID for the sensors being used. A lot specific pHID is printed on the blue kit packaging (25050 in the example below). Use the pHID on your kit packaging when setting up to read the pH.
Pictured: Example Sensor Label
CAUTION: The pHID 25050 is an example pHID used only for demonstration.Do not enter 25050 as your pHID for testing purposes.
Pictured: Site Standardization Screen
Measure each (1) sensor once in the incubator. Press the sensor into the fixture making sure the sensor is fully seated in the fixture. Keep index finger covering the top of the sensor while pushing the Go button on the TrakStation as this lowers the amount of ambient light interacting with the sensor and ensures it is fully seated in the fixture.
CAUTION: Constant opening/closing of the incubator door will lower the temperature and CO2 in the incubator. Read all three (3) sensor readings quickly (within 30 seconds) OR allow time for the incubator and the sensor to re-equilibrate.
Upon completing the readings, use the checkboxes to select pH results from your sensor readings to average and push the average button. Do not select a reading if there was an issue with that reading.
Pictured: Site Standardization Screen Continued
Enter your reference pH. The software will calculate your offset and allow you to SET it for the TrakPod.
Pictured: Site Standardization screen continued
If sensors are to be re-read on a different TrakPod, place the sensors back into the incubator and allow them to re-equilibrate at temperature and CO2. Re-equilibration is essential for accuracy. The sensor out of the incubator slowly changes the pH levels because of temperature decreases- if you repeatedly read the sensor outside of the environment you will get varied results.
NOTE: For multiple incubators, it is not required to use three (3) new sensors for every TrakPod. For example, with four (4) TrakPods, Site Standardization can be performed by equilibrating four (4) sensors all in one incubator. Three (3) or four (4) sensors can be read on the first TrakPod in the equilibrating incubator. The reference pH to enter is the pH measured in that incubator. Then the sensors can be moved quickly to the next incubator. Preferably allow as much time for the sensors to re-equilibrate in the incubator as the time spent moving between incubators. This is for temperature to return to ideal level. Then do site standardization on the second TrakPod. Again, use the pH measured in the first incubator as the reference pH as the sensors’ CO2 levels will not have changed in a short period of time (5 to 15 minutes). Repeat with the third and fourth incubator in the same manner. Finally, place one (1) sensor on each TrakPod and begin monitoring pH for the rest of the week.
This standardization protocol is specific to the media type used. If a different media type is to be used with the TrakStation System you must repeat this protocol for the new media type and adjust your “Offset Values” accordingly.
Why an Offset Value?
Because the setup at BCSI was done under unique conditions, an “Offset Value” is required for every clinic and media type or incubator. This value corrects for the subtle differences between Seattle, WA (where the unit was manufactured) and your clinic. Our Site Standardization protocol assures that the unit is aligned for maximum precision and will match the CoA of the media being used for a specific cycle.
The normal workflow when using the TrakPod is as follows:
Run a quality-control (QC) test before first use, and on a weekly schedule between pH testing runs;
Before pH testing, set up and equilibrate the media sample and sensor allowing an overnight 10-24 hour period for equilibration;
Place the sensor into the fiber fixture and start the pH testing. The instrument then reads the pH at either 30-minute or 1-minute intervals (which you can set using the CHANGE MEASUREMENT FREQUENCY setting);
After 7 days of 30-minute pH testing or 3 days of 1-minute pH testing with a single sensor, stop the testing by pressing the END TEST button.
The user interfaces for each Pod has the functions needed for running pH tests, performing QC tests and other functions relevant to the Pod (See Pod Page).
Pictured: TrakPod User Interface
Quality Control (QC) Testing
What is the QC Alignment Tool?
The quality-control (QC) alignment tool is an aluminum tube containing a small amount of fluorescent dye. One QC alignment tool can be used on all the connected TrakPods individually. When you read the alignment tool with the TrakStation and TrakPod, it gives a known and stable reading. You use it to make sure the Pod is operating correctly. It is recommended to take a QC measurement for each TrakPod on initial installation, once a week during use, and after cleaning or disinfecting the TrakPod components.
Keep the QC alignment tool protected in the provided bag when you are not using it. If it develops scratches or collects dust, it will not give a true reading. Replace the alignment tool when it reaches its expiration date (typically one year).
CAUTION:Never try to open or repair the alignment tool. If you believe your QC alignment tool has been damaged or require a replacement, please contact BCSI Technical Support by emailing support@safesens.com.
Weekly QC Testing
1. Put Y### control sensor on probe: Check the serial number of the qc2 alignment tool matches with the serial number listed on the TrakStation. It can be helpful to apply some downward pressure to the qc2 for the test to ensure it is fully seated on the fiber optic fixture.
Pictured: Run QC Test From TrakPod Page
NOTE: The FIND FIBER button will cause the Pod to flash the LED several times and allow you to locate which fiber optic might be associated with the chosen Pod.
CAUTION: DO NOT USE A SV2 SENSOR FOR A QC ALIGNMENT TEST- this will cause faulty pH readings.
If you attempt to use a sv2 sensor for the QC Alignment Test, you will not be able to successfully complete alignment.
Pictured: QC Test Failure From Sensor on Fixture
2. Clean Fiber Probe: use a lint-free tissue like a Kimwipe to remove any dust from the fiber optic surface.
CAUTION: Don’t use liquids on the fiber optic surface.
Pictured: Cleaning Fixture With a Wipe
3. Regular weekly QC testing is performed like initial QC testing. The QC test is run from the Pod menu or the Settings page. After selecting the QC test use the following window to proceed through the test. Make sure that the serialized qc2 Alignment Tool selected to run the QC Test on the TrakPod is the same control sensor you are using for QC Testing.
Pictured: QC Alignment Tool on Fixture
4. Press the CONTINUE button: The TrakPod will test the fluorescent signal and compare it to the assigned fluorescent levels.
5. The Screen will then display the result of the QC Test.
6. If the test failed, a message about the failure will be displayed with an attempt counter.
Pictured: QC Test Failure With Attempts Value
For a full list of potential failure cases, please see Section 7 Troubleshooting
7. Typically, you should rerun the QC test, paying careful attention to the cleanliness of the fiber, and the correct placement of the alignment tool in the fixture. Confirm that the correct TrakPod is being tested using the Find Fiber button.
8. Once confirming that the correct Trakpod is being tested, please repeat QC testing until all 3 attempts are completed.
9. After 3 failures, the TrakPod may be re-aligned. Re-align the TrakPod using the re-align TrakPod button. The TrakPod will then adjust the TrakPod to original alignment specifications.
Pictured: QC Test Success After Re-Alginment
10. If failures persist, contact BCSI Technical Support by emailing support@safesens.com.
Regular pH Testing
Before you begin testing a media sample for pH, prepare the sensor and the sample as described. Preparation of a sensor is like the site standardization, but only requires one (1) sensor per TrakPod. Regular pH testing has a more flexible equilibration time range (> 10 hours) as the exact pH value for the first pH read is followed by continuous pH data for comparison, rather than used to create an offset value for the equipment.
Remove the Sensor aseptically from the sterilization pouch in which it arrived. A lot specific pHID is printed on the blue kit packaging (25050 in the example below). Use the pHID on the kit packaging when setting up to read the pH. The LOT and hour glass symbols refer to a lot number and the expiration date (prior to use) of the sensor, respectively.
Pictured: Example Sensor Label
CAUTION: The pHID 25050 is an example pHID used only for demonstration.
Do not enter 25050 as your pHID for testing purposes.
Prepare the sensor as follows:
Pictured: Sensor Preparation
3. Media:
Use 100 µL of media. Hold the sensor with the opening upward. Carefully pipette media down the side of the sensor. Avoid adding bubbles while doing this step. It works best not to fully dispense the entire volume from the pipette tip. Also avoid touching the pipette tip to the membrane. The media is not to be pre-equilibrated.
4. Oil:
Use 50 µL of oil for humidified incubators. Use 150 µL of oil for dry incubators. Using an oil intended for cell culture, pipette an oil overlay onto the media. Avoid adding bubbles while doing so. Again, it works best not to fully dispense the entire volume from the pipette tip. The oil prevents the media from evaporating in the course of several days of pH monitoring. The oil must completely cover the media. Increase the volume of oil if the oil layer looks too thin. The oil volume does not interfere with the pH measurement. The larger volume of oil for dry incubators helps to slow the media evaporation over the 7 day pH testing. It will increase the time needed for equilibration, but not beyond the 10-24 hours we recommend below.
5. Place the sensor in the incubator that will be monitored, and allow the sensor and the media to equilibrate in the environment overnight (10 to 24 hours). The following morning place the sensor in the fiber optic fixture and begin the pH monitoring. A Sensor with a 30-minute pH reading frequency can be used for seven days. Start a test from the TrakPod page with the NEW TEST button.
Pictured: New Test Screen
6. Enter a unique test ID and the pHID from the blue sensor package and press SAVE. The TrakPod will then start reading pH with the desired frequency. To take a reading at anytime, press the green refresh icon).
Additional Useful Guidelines:
Bubbles may appear in the sensor over time; this is only a problem when they are large and completely separate the membrane from the fluid in the sensor. In this case, dislodge the bubble with a pipette tip.
The TrakPods have an automatically applied drift correction. During use, the Sensor’s pH level slowly decreases but this change is accounted for with the drift correction. The correction is based on the frequency of the reading and the amount of time a sensor has been on test.
CAUTION: Be sure to end current tests and start new tests when a new sensor is used; otherwise, the old test’s drift corrections will impact the pH readings of the new sensor and the reading will be inaccurate.
Best practices for working with multiple Benchtop Incubators and TrakPods
The day prior to ending pH tests prepare new sv2 sensors and begin their equilibration.
At the end of 7 days (for the 30-minute test frequency), end all the pH tests and remove and discard the old sv2 sensors so none of the fixtures have sv2 sensors on them.
Run the qc2 Alignment Tests for each of the chambers followed by cleaning and disinfecting the chambers.
Place all the new sv2 sensors onto the fixtures.
Start the new pH tests using the “Start Test on Multiple Pods” button of the “New Test” window.
Following these steps will prevent incorrectly running a QC Alignment Test on a chamber that still has an old sv2 sensor in it.
Shut Down and Storage
The TrakStation can be shut down by holding the power button down to power it off. Then unplug the tablet and store it. The TrakPod USB may be disconnected to shut it down and prepare it for storage.
Storage conditions for the electronics are 5 – 40°C (41 – 104°F) and 5 to 95% Humidity.
Disposal and Recycling
The TrakStation and TrakPod contain electronics and should be recycled. Do not dispose of these items in normal waste. Contact the original tablet manufacturer or your local resources for electronics recycling options.
Recyclable Components
Component
Material
Housing (TrakStation and TrakPod)
Plastic
Screen (TrakStation)
Glass
Printed circuit boards (TrakStation and TrakPod)
Enclosed electronic components mounted on PCB
Fiber optic cable (TrakPod)
Plastic
Fixture (TrakPod)
Aluminum
The qc2 Alignment Tool contains aluminum and may be recycled or it may be discarded in unregulated waste.
The sv2 Sensor may be discarded in normal unregulated waste or a waste method that is used for consumed media.
The exterior of the TrakStation can be cleaned periodically. Turn off the TrakStation, disconnect from power and disconnect the TrakPods prior to cleaning the exterior surfaces.
Apply Oosafe Disinfectant Spray evenly to all surfaces of the TrakStation. Allow the solution to sit on the surfaces for a minimum of one (1) minute.
Moisten a sterile non-linting cloth with purified or sterile water and wipe all surfaces for a minimum of one (1) minute. If needed, use additional cloths if cloths become visibly soiled.
Allow TrakStation to air dry.
Visually inspect TrakStation for the absence or presence of remaining soil. While inspecting, give particular attention to verifying soil has been removed from hard-to-clean areas. If soil is present, then repeat the manual cleaning steps until all visible soil is removed.
Reconnect power and cables and turn back on.
TrakPod
The TrakPod fixture component is cleaned and disinfected with the incubator chambers. Run the qc2 alignment test prior to cleaning and disinfecting. Follow instructions for cleaning and disinfecting the incubator that are found in the incubator user’s manual.
sv2 Sensors
CAUTION: The sv2sensors cannot be cleaned, disinfected or reused.
qc2 Alignment Tool
Cleaning
The exterior of the QC Alignment Tools may be cleaned in the same manner as described for the TrakStation above. Do not attempt to open or clean the inside of the QC Alignment Tools.
Disinfection
After the surfaces are clean and all visual soil has been removed, proceed with the following instructions to disinfect the surfaces as follows:
Promptly soak up excess liquid using a sterile cloth.
Apply Oosafe Disinfectant Spray evenly to all exterior surfaces. Wait a minimum of 15 minutes for the surfaces to dry for best results.
Moisten a sterile non-linting cloth with purified or sterile water and wipe all disinfected surfaces for a minimum of one (1) minute.
Thoroughly dry all surfaces using a sterile, lint-free wipe or cloth, changing wipes / cloths when necessary to ensure the incubator surfaces are completely dry. Visually inspect the surfaces of the incubator to ensure all surfaces are clean and dry. Repeat drying steps if any moisture is visible.
The TrakStation is a menu-driven user interface. The various available functions are described here. The touchscreen interface may be navigated with fingers or stylus. A stylus is included with the HP model tablet. A stylus is not included with any other model tablets.
Pictured: HP Stylus
CAUTION: Screen burn can occur when the same image is displayed for a considerable amount of time on the TrakStation tablet. There are several preventative measures that can prevent or minimizer screen burn-in.
HP tablet users should consider a software input change for a screen saver as a preventative measure.
ACER and Lenovo tablet users can use the volume buttons to dim and turn off the screen backlight.
Windows tablet users can set screen settings as desired.
Home Page
Access the home page by pressing the icon.
Pictured: Home Page
On this page, the currently added pods are displayed with the most recently measured pH values. Pressing on the box around a Pod will bring you to a specific page for the pod.
Pod Page
Pictured: Pod Page
The Pod page shows a summary of the start time, remaining time and current pH. A plot shows the pH history of readings that have been collected.
Start a new test by pressing the NEW TEST button (changes to END TEST when a test is running).
End the current test by pressing the END TEST button. After seven (7) days of pH monitoring with the thirty (30) minute frequency, or three (3) days with one (1) minute frequency, the current test will automatically end and a new sensor can be started.
Do the QC test with the System Alignment tool by pressing RUN QC TEST.
Perform the initial Site Standardization readings for the pH meter with the SITE STANDARDIZATION button.
The FIND FIBER button causes the Pod LED to flash several times, allowing you to locate the fiber optic associated with the chosen Pod.
Download data from the device for this Pod or for all connected Pods with DOWNLOAD DATA. In this function, you may also email the data if the Tablet is configured for network connectivity.
Adjust time displayed on plot using the buttons below the X-AXIS. Time and pH ranges can be adjusted by placing two fingers on the display screen and either spreading or joining together the two to adjust zoom level. Additional controls include:
Mouse Controls (For Remote Browser users): Zoom In: Click+Drag Pan: Shift+Click+Drag Restore Autoscale: Double-Click
*Zoom out is not possible past the auto-scaled pH range when using mouse controls.
Settings
Access the settings page by pressing the icon. The settings page allows you to adjust commonly changed settings on the TrakStation.
Pictured: Settings Screen
From this page a number of different functions can be implemented.
RUN QC TEST: Perform QC test with the QC Alignment tool. This should be done once per week. It can also be reached from the individual Pod page.
OFFSET VALUES: View and adjust offset values assigned to each Pod through the Site standardization protocol.
ADD/REMOVE PODS: Setup and remove TrakPods from the TrakStation interface.
ARRANGE PODS: Change the order in which the connected TrakPods are displayed on the TrakStation interface.
Supervisor Screen
Access the Supervisor page by pressing the icon. Less common settings and those that only a supervisor should have access to changing are available on the supervisor screen. The default PIN for accessing the Supervisor page is 12345. You can change this PIN using the on-screen menus options.
Pictured: Supervisor Screen
From this page a variety of settings can be adjusted including:
INSTRUMENT NAMES: Change the names displayed for Pods. This can make referring to various TrakPods easier when using identifiers for what incubator they are in.
SET pH ALARM LIMITS: Set pH limits for each TrakPod with your own upper and lower acceptable values.
NETWORK SETTINGS: Connect the TrakStation to the local internet and specify IP address settings and wireless network keys if applicable.
TRAKSTATION® SOFTWARE UPDATE: When a new version of TrakStation software is available, use the SOFTWARE UPDATE and either download the software from the web (if the Tablet is configured to do so) or select the appropriate file from a connected USB drive and update the system
TRAKPOD® FIRMWARE UPDATE: When a new version of TrakPod firmware is available, use the FIRMWARE UPDATE and download the firmware from the web, load onto a USB drive, and select the appropriate file from the connected USB drive and update the connected pods.
SET QC ALIGNMENT ID: Enter a new QC alignment tool or update the values for the QC alignment tool when it is replaced. On an annual basis the QC alignment tool is replaced with a new one and the fluorescent values for the new standard are programmed into the TrakStation using this menu.
pH ALARM NOTIFICATIONS: Configure an email address to send notifications when pH values are outside their intended limits.
DATA FORMAT: Change the format of downloaded data. The downloaded CSV file can be separated by commas or semicolons, and additional items of data from each pH reading can be downloaded and queried.
DRIFT CORRECTION: For some media types, a small increase or decrease in pH over time is noticed. This is an artifact of the fluorescent reading system. Use the DRIFT CORRECTION button to make updates to the correction factors used by the system. This should only be done at the advice and guidance from Blood Cell Storage, Inc. support. Please contact support@safesens.com for assistance.
TIME/DATE: Reset the time on the TrakStation. If an internet connection is available, the time and date can be automatically updated by the TrakStation. The tablet must be rebooted for time/date changes to be made effectively in the TrakStation software
CHANGE MEASUREMENT FREQUENCY: Switch between a thirty (30) minute test frequency (seven (7) day sensor lifetime) and a one (1) minute test frequency (three (3) day sensor lifetime).
ACTIVATE ADD-ONS: Enable and configure additional features of the TrakStation, such as outputting pH data to a third-party lab monitoring platform.
MESSAGE SUPPORT: Message and send all pH and system data to our support team from an internet-connected TrakStation. Please include required information for the support team such as location information, issue category, and a description of your issue.
Help
Access the Help menu by pressing the icon. Here there are answers to some of the common issues encountered when using the TrakStation and TrakPods.
Pictured: Help Screen
Click an applicable question to get information about that particular question.
Additionally press the Mail Icon () to message Support using our Support Team form. Please include required information for the support team such as location information, issue category, and a description of your issue.
Pictured: Message Support Screen
Remote Access
If your TrakStation is network connected it is possible to access all the controls of the TrakStation from a separate computer that is on the same network. Use a web browser and navigate to http://###.###.###.###:8080/hydra/ where ###.###.###.### is the IP address of the TrakStation which is network connected. This IP address can be found in the lower left corner of the TrakStation page (10.1.1.201 in the example).
Pictured: Remote Access IP Address
If you find issues connecting from a separate computer check with your IT department and ensure that it is on the same network and that your network router’s settings are not blocking communication on port 8080.
It is also possible to access data files that have been downloaded to USB drives from a remote computer. In windows explorer type in the address bar \\###.###.###.###\ where ###.###.###.### is the IP address of the TrakStation which is network connected. If there are issues connecting to shared folders, check with IT department to ensure that ports 137, 138, 139 and 445 are not blocked.
Pictured: Windows Explorer View of TrakStation IP
Then navigate to the Logs folder where copies of all files saved to USB drives are located. These files will even be created when the download to USB button is pressed but no USB drive is connected to the TrakStation.
Common issues with TrakStation and TrakPods as listed in the table below with possible remedies. In some cases the software issues experienced have already been solved in a recent software release. Check the update page for more information and to see if you have the latest versions of software for your TrakStation and TrakPods.
Issue
TrakStation Error message
Remedy
Connected TrakPods not appearing on home screen.
NA
Check that the TrakPods is properly added and saved to the Authenticated Pods list.
Red border surrounds TrakPod(s) on home screen.
Error: Could not detect selected TrakPod! Check USB and Power cable connections. (Failed to Parse request)
Error: Internal Server Error (error)
This may impact only one TrakPod or all TrakPods. If only one TrakPod focus on that one TrakPod’s USB connections.
Check all USB cable connections at TrakPod, USB hub, and TrakStation and power connection for USB hub. Especially check the USB cable connection at the back of the TrakPod.
If observed following a reboot of the TrakStation, physically disconnect all of the TrakPod USB cables from the USB hub and then reconnect them.
pH measurements are less than 6 or 10.
NA
Check that a properly-prepared sensor containing media and oil is in the fixture. Ensure the correct pHID is being used.
QC Alignment test produces errors
Error: No Signal (X of 3 attempts). Please ensure QC alignment tool is on fixture
Check fixture assembly and the presence of QC2 Alignment tool. Confirm the correct fiber optic is being tested by pressing the “Find Fiber” button and observing 3 green flashes from the fiber optic fixture.
QC Alignment test produces errors
Error: Fail- Sensor on fixture (X of 3 attempts). Please use the black QC alignment tool
QC Alignment test recognized a test sensor is on the fixture. Please remove any items that are in the fiber optic fixture and place the black QC alignment tool firmly in the fixture. Re-attempt QC testing.
QC Alignment test produces errors
Error: Low FR Signal (X of 3 attempts). Please Check fixture and test again.
Ensure QC2 Alignment tool is sitting completely on the fiber optic fixture. Ensure correct serial number QC2 Alignment tool is being used. Check the condition of the fiber optic cable, ensuring the fiber optic cable is not compressed or damaged.
QC Alignment test produces errors
Error: QC Test Failed. (X of 3 attempts) Please test again.
QC test will allow for 3 failed test attempts before a realignment to change the gains of the TrakPod occurs. If an error code occurs after re-alignment, contact support to further resolve this issue.
Cannot run a QC Alignment Test
You cannot run a QC Test without setting a QC Alignment ID. Program QC Alignment ID in Supervisor menu!
Prior to first running a QC Alignment test you will need to program the QC2 Alignment information in the supervisor’s lock menu.
TrakPods are not responding on TrakStation interface.
Error:(error)
Communication service to TrakPods has stopped unexpectedly, normally it will restart on its own. If this persists, reboot the TrakStation
TrakStation or TrakPod update has error.
Error:(error)
If this appears during software update processes it means there is no USB flash drive detected.
TrakStation screen shows signs of screen burn-in or displays ghost image of previous pH testing
NA
If screen burn is significant enough to affect everyday use, contact your support contacts to further resolve this issue or replace the TrakStation tablet.
USB flash drive not recognized or working for data downloads
Error: Could not detect USB drive! Connect a TrakStation-support USB device and repeat data download. Or, access data file through email or remote access functions
Error: Input failed validation, please verify input and try again
Error: QC Alignment ID not valid
The QC Alignment ID is not correctly entered. Check that the dashes are included in the entry and that zeros and the letter “o” are not mistaken.
Adding and Removing TrakPods is not working.
localhost:8080 says: You must select an authenticated (or a non-authenticated) pod to add / remove / delete.
When adding or removing TrakPods, be sure to select a TrakPod prior to trying to change its status.
Forgot PIN for supervisor access
Incorrect PIN Please contact support [RESETCODE]
If you have changed your PIN from the default 12345 and forgotten your TrakStation PIN for accessing the locked settings, contact support with your reset code and the PIN can be changed with an override code.
pHID is not recognized by TrakPod
Error: The pHID entered was not recognized. This TrakPod may only be used with [COMPANY NAME] pH sensors
Error: The pH reading request was denied by pod.
Check that the code is typed correctly.
If the TrakStation informs you to contact a certain company representative, the TrakPod you are trying to use requires sv2 sensors which have been setup specifically for that product.
For example: TrakPods in ESCO Miri Incubators require sv2 sensors obtained through your ESCO representatives.
pH seems unexpected either consistently off or changing over time in unexpected way.
TrakStation and TrakPod support can be obtained by emailing support@safesens.com. Please include a description of your issue, any information you have about serial numbers and lot numbers of products in question and any log files that you are able to download.
The technical support page for the TrakStation is here.
The TrakStation has no user serviceable components. Software updates for TrakStation can be obtained online for download here. BCSI recommends running the most current software version, and will support users running the current software version as well as the prior version in the indicated timeframe noted on the update page.
The TrakPod has no user serviceable components. Firmware updates are possible through the TrakStation user interface. Firmware updates can be downloaded here and follow on screen instructions via the supervisor settings “Update Pods” function.
The TrakStation technology is based on the principle that fluorescent dyes emit characteristic wavelength spectra at different pH levels.
The sv2 sensor is a modified optical cuvette that creates a liquid well in which the pH of a media sample can be tracked. The sensor fits into a fiber optic fixture and includes a special membrane located at the bottom of the liquid well. The membrane is impregnated with a fluorescent dye that emits characteristic wavelength spectra at different pH levels. Periodically, the instrument measures the pH of the sensor. (You can choose the timing of this measurement to be at one or thirty-minute intervals.)
During measurement, the fiber optic delivers flashes of green light from a monochromatic light source to the sensor. The light excites the dye in the membrane and induces fluorescent light emission at two wavelengths. At 600 nm, the intensity of light emission varies with the pH of the media. At the second, reference wavelength, 568 nm, the emission does not depend on the pH.
The intensities of emissions at these two wavelengths are collected by photo-detectors in the TrakPod. The instrument calculates the ratio of the two wavelengths and converts it to the pH. Using a ratio of emission intensities allows determining the pH independently of any varying characteristics of the particular instrument used. The instrument also uses the reading frequency and the duration of the test to make small automatic corrections to the pH signal.
Blood Cell Storage, Inc. (BCSI) warrants that, at the time of shipment, the instrumentation provided to the customer is free from defects in material and workmanship.
This limited warranty is conditioned upon the customer giving BCSI notice of any defect within two (2) years after shipment. This limited warranty will not apply if the instrumentation (a) has not been installed, used, or maintained in accordance with applicable instructions and manuals; (b) has been repaired or altered by unauthorized persons or misused, abused, accidentally damaged or subjected to operation for which it was not intended; or (c) has had its serial number altered or removed. This limited warranty does not apply to consumable items. Except as expressly stated herein, BCSI makes no other warranties, express or implied, including warranties of merchantability or fitness for particular purpose.
Under this limited warranty, BCSI at its option, will repair or replace any defective instrumentation. This is the sole remedy for any breach of warranty. Any instrumentation to be returned for repair or replacement must be properly packaged and shipped via prepaid freight in accordance with BCSI instructions. This limited warranty does not apply to the use of the instrument other than as described herein.
This limited warranty contains BCSI’s sole obligation and liability related to the customer’s use of the BCSI products. BCSI shall not be liable to the customer for any other remedies of damages, including special, indirect, incidental, and consequential damages, including, but not limited to, lost profits, whether based upon warranty, strict liability, tort, contract or otherwise. This limited warranty may not be changed in any way without the express written permission of BCSI.
Each provision of this agreement that provides for a limitation of liability, disclaimer of warranties, or exclusion of damages is to allocate the risks between the parties. This allocation is reflected in the pricing offered by BCSI to the customer and is an essential element of the basis of the bargain between the parties. Each of these provisions is severable and independent of all other provisions of this agreement. The limitations in this section will apply notwithstanding the failure of essential purpose of any limited remedy in this agreement.
Varies by model of tablet computer, typical dimensions based on 10” screen size.
25.0 cm x 17.5 cm x 0.9 cm
(9.8 in x 6.9 in x 0.3 in)
Weight of TrakStation
Varies by model of tablet computer, typical dimensions based on 10” screen size.
Minimum External connections
USB 3.0 Port (or Type C 3.0 Port with adapter)
DC-in jack
Touchscreen
10” to 12” touch screen (1280 x 800 or better)
Power requirements
TrakStation AC power adapter
UL marked power adapter
Input to power adapter:
100 – 240 V50-60 Hz
Output (varies by model of tablet computer):
5 to 19.5 V DC, 2 to 4 A
USB Hub AC power adapter
UL marked power adapter
Input to power adapter:
100 – 240 V AC, 50 – 60 Hz
1.2 A
Output:
12 V DC, 4 A
Power requirements
TrakPod power
Input:
DC power over USB connection
5 V DC, 0.5 A (standard USB 2.0)
Operating, Transport and Storage temperature
5 – 40°C (41 – 104°F)
Operating, Transport and Storage humidity
5-95% relative humidity, non-condensing
(For the components outside of an incubator)
Operating environment
Intended for indoor use only
Altitude not specified, Pollution Degree 2
Operating, Transport and Storage humidity
5-95% relative humidity, non-condensing
TrakStation Performance Specifications
Item
Value
pH measurement accuracy and range
0.05 pH units within pH 7.00 to 7.60
pH resolution
0.01 pH units
pH Sensor lifetime
7 days of use with 30 minute reading frequency.
3 days of use with 1 minute reading frequency.
Shelf life is labeled on the packaging of sensor. (Typically one year from pHID assignment)
Optical control
QC Alignment Tool (minimum 12 month lifetime)
Certification
Item
Value
Safety class
Class A
FCC
Part 15 Subpart B Compliant
2014/30/EU
Electromagnetic compliant
2014/35/EU
Low voltage compliant
EN 61010 revision 3
Conforms
RoHS
Compliant
Specifications are subject to change without notice.
Symbol Glossary
Symbols used in all labeling are summarized below in the table.
Symbol
Symbol Title
Symbol Description
Caution
Indicates a potentially hazardous situation which, if not avoided, may result in minor or moderate injury. It may also be used to alert against unsafe practices.
Manufacturer
Indicates the device manufacturer.
Authorized Representative in European Community
Indicates the Authorized representative in the European Community.
Date of Manufacture
Indicates the date when the device was manufactured.
Use-by Date
Indicates the date after which the device is not to be use.
Batch Code
Indicates the manufacturer’s batch code so that the batch or lot can be identified.
Catalogue Number
Indicates the manufacturer’s catalogue number so that the device can be identified.
Serial Number
Indicates the manufacturer’s serial number so that a specific device can be identified.
Keep Away From Light
Indicates a device that needs protection from light sources.
Sterilized using ethylene oxide
Indicates a device that has been sterilized using ethylene oxide.
Temperature Limit
Indicates the temperature limits to which the device can be safely exposed.
Humidity Limit
Indicates the range of humidity to which the device can be safely exposed.
Atmospheric Pressure Limitation
Indicates the range of atmospheric pressure to which the device can be safely exposed.
Consult Instructions For Use
Indicates the need for the user to consult the instructions for use.
Control
Indicates a control material that is intended to verify the performance characteristics of another medical device.
CE Marking
Signifies European technical conformity.
Recycle Electronic Equipment
Do Not Dispose of this equipment in normal trash.
FCC Declaration of Conformity
Certification mark employed on electronic device which indicates that EMC is under limits approved by FCC.
Intellectual Property
“SAFE Sens”® , “TrakStation”® , “TrakPod”® , and “Innovations that make a difference”® are registered US, Canadian and/or European trademarks owned by Blood Cell Storage, Inc. (BCSI).
The SAFE technology is covered by multiple issued and pending US and International equivalent Patents including but not limited to: US Pat. No. 7,608,460, 7,968,346, 8,148,167, 8,183,052, 8,497,134, 9,040,307, 9,062,205, 9,217,170; AU Pat. No. 2005277258; JP 特許番号 5017113; CN 专利号 ZL200580033961.1; IN Pat. No. 257667.


 Pictured: Lenovo / MS Surface to USB Hub
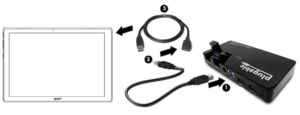


 Pictured: TrakPod User Interface


 Pictured: Home Page
 Pictured: Supervisor Screen